
Apple's MacBooks feature several options related to conserving the system’s battery and the amount of charge it has left. The main way it achieves this is through sleep mode, which puts the Apple laptop into a temporary sleeping mode that uses the least amount of power possible while still giving you the option to wake it up immediately and continue from where you left off.
If you don't want sleep mode to interrupt what you and your MacBook are doing, though, there are a few ways to keep it always running – here's how to do it.
Turning off sleep mode via Energy Saver/Battery settings (MacOS Ventura and later)
Some things changed with the introduction of MacOS Ventura. The name of the utility used to configure your Mac has changed from "System preferences" to "System Settings." And the format changed from an icon-oriented interface to tabs along the side. Many of the specific system settings also changed. So, if you're moving from a Mac with a previous version of MacOS, you'll want to follow these instructions.
Nevertheless, it remains simple enough to turn off sleep mode in MacOS Ventura and later.
Step 1: Open System Settings.
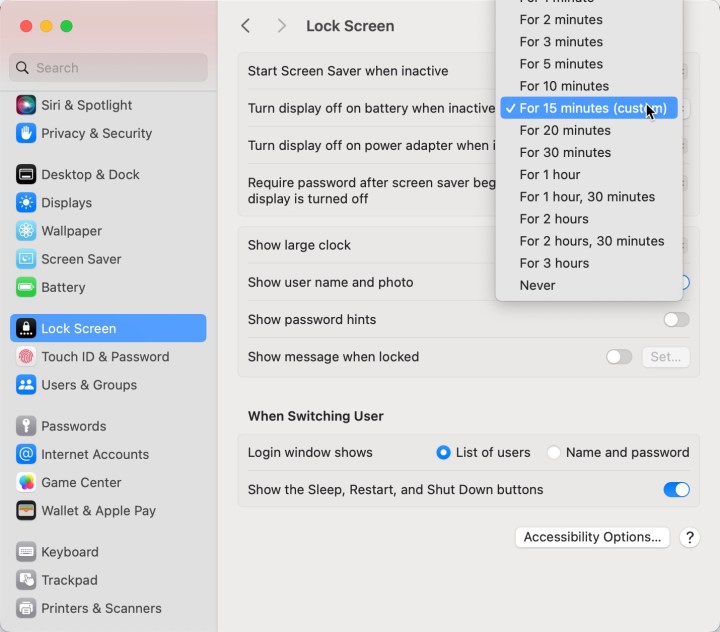
Step 2: Select the Lock Screen tab. You'll find two options: Turn display off on battery when inactive and Turn display off on power adapter when inactive. Next to each will be a selection for how long the display should be inactive before turning it off. Select "Never" to prevent your Mac from sleeping,
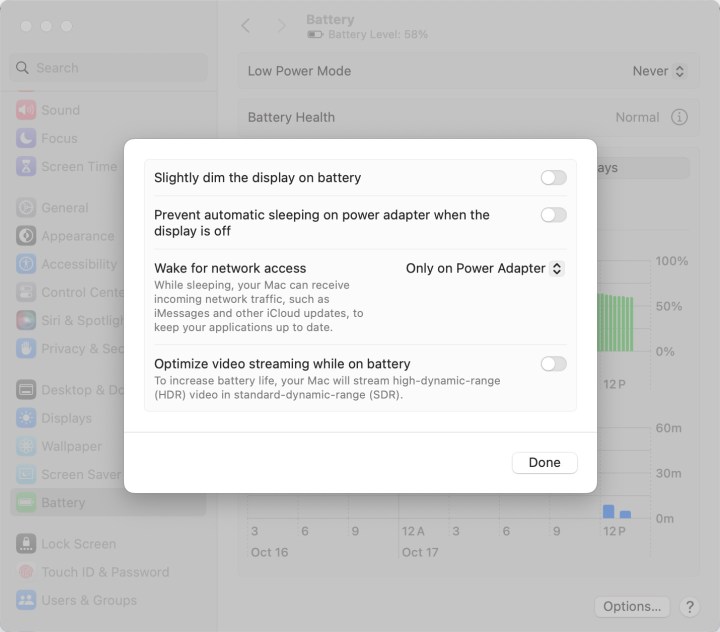
Step 3: You can also make sure your Mac doesn't go to sleep when plugged in and the display is off. To do so, select the Battery tab, then Options.... Then toggle Prevent sleeping on power adapter when the display is off to on.
Turning off sleep mode via Energy Saver/Battery settings (prior to MacOS Ventura)
Step 1: Select System preferences.
Step 2: Choose the Energy saver icon (or Battery for newer versions of MacOS).

Step 3: There are two tabs – Battery and Power Adapter. The former will be selected automatically when opening Energy Saver, so let’s start with that.
By default, the Turn Display Off After section will already be set to a specific time, which is used when there’s no activity being detected on the Mac.
In order to disable this feature completely, drag the slider to the right where it says Never.
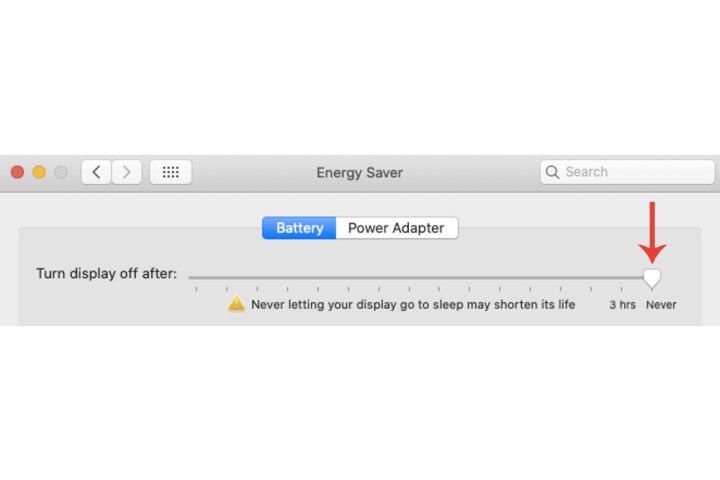
Step 4: A warning window will appear stating that the MacBook may consume more energy with these specific settings. Hit the OK button to confirm the change.

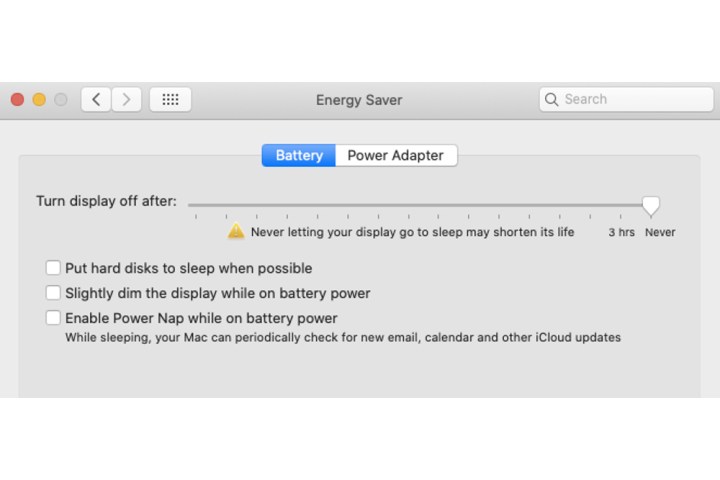
Step 5: Below the slider, there’s a few additional settings that you can disable as well:
- Put hard disks to sleep when possible
- Slightly dim the display while on battery power
- Enable Power Nap while on battery power
Step 6: Select the Power adapter tab and drag the slider to the right once again to Never, and also turn off some of the settings below (keep the first one turned on):
- Prevent computer from sleeping automatically when the display is off
- Put hard disks to sleep when possible
- Wake for Wi-Fi network access
- Enable Power Nap while plugged into a power adapter

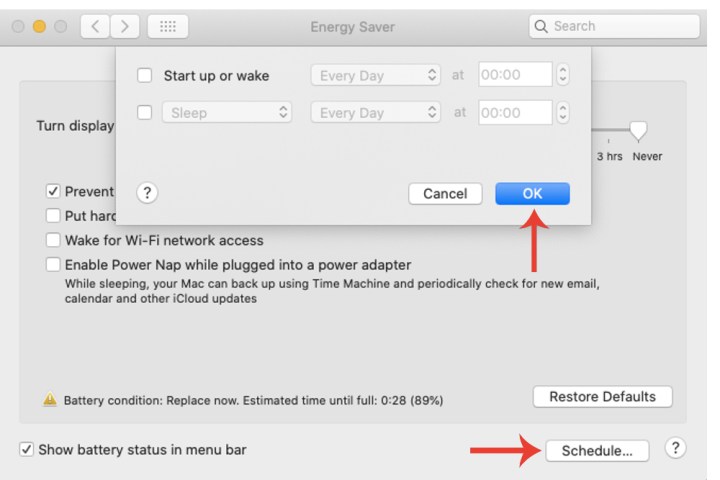
Turn off Schedule (prior to MacOS Ventura)
If your Schedule tool is enabled within Energy Saver, then you’ll need to turn that off as well to keep your MacBook from sleeping.
Step 1: Select the Schedule button.
Step 2: Untick the boxes Start up or wake and Sleep boxes. Select the OK button.
It’s important to highlight how your battery will be affected if there are no sleeping options enabled for your Mac. As Apple itself states within the Energy Saver window, never allowing your display to go to sleep may shorten its life.
If the Mac is always operational when it’s not completely shut down, then this will impact the overall health of your system’s battery, too.
For more on how to preserve your MacBook's battery and extend its overall life, check out our detailed guide.
Editors' Recommendations
- How to downgrade from macOS Sonoma to an older version
- MacBook Pro M3: Should you choose the M3, M3 Pro, or M3 Max?
- How to use a blue light filter on your PC or Mac
- Why the MacBook Air is still stuck on the M2
- The M3 is the most important chip Apple has ever made


